When it comes to the average dwelling, some design decisions make more sense than others. A large bay window overlooking a lush backyard landscape? Beautiful. A crystal-clear casement window facing the toilet in a bathroom? Not ideal. While blinds or shades can be a great way to cover up challenging windows, frosted glass offers another option for obscuring the view without sacrificing natural light. Frosted glass has long been used to provide privacy, diffuse light, add a decorative touch, or any combination of these.
Glass windows are "frosted" through sandblasting or acid etching, which creates a pitted texture that scatters the light. Want to replace your traditional panes with frosted windows? Be warned: The price is significantly higher than clear glass. But fear not! There are a number of DIY ways to create a frosted glass look and enjoy all the benefits-without breaking the bank. Whether you want a removable solution for a rental unit, a temporary measure while you save for custom window treatments, or a permanent and lasting method, Bloomin' Blinds has you covered. Read on!

One of the easiest and most forgiving methods for DIY frosted glass involves decorative window film or adhesive vinyl shelf lining. Decorative window film adheres using static cling, so it is entirely removable and repositionable. Vinyl shelf lining or contact paper sticks using a gentle adhesive, meaning it can also be removed easily and without damage; however, removing or repositioning it can weaken the adhesive and cause curling edges or drooping.
With either product, be sure to start by cleaning the surface of the windows thoroughly. Measure and cut carefully to fit the area. To avoid gaps, you may even want to allow for an extra half-inch or so on all sides, which you can trim off with a utility knife once you've applied the film to the window. Adhesive-style lining is generally applied to a clean, dry surface, while the static-cling film works best applied to a wet window-be sure to read the application instructions included with your product. Some kits will include a plastic squeegee for smoothing out any air pockets or bubbles; if yours doesn't, use the edge of a plastic credit card or similar straight edge.
You can find window film in a solid frosted-glass style or with a decorative pattern. Feeling crafty? Create your own custom cutout design in solid film prior to application. Trace a pattern or design onto the paper backing of the film, then cut it out using a sharp utility knife and cutting board. Apply as normal.
Benefits of window film:
Challenges of window film:
For very inexpensive and removable option, turn to your kitchen cupboard! Adhere lace or tissue paper to your windows with a simple paste of cornstarch and water for completely customizable results.
To make the cornstarch paste:
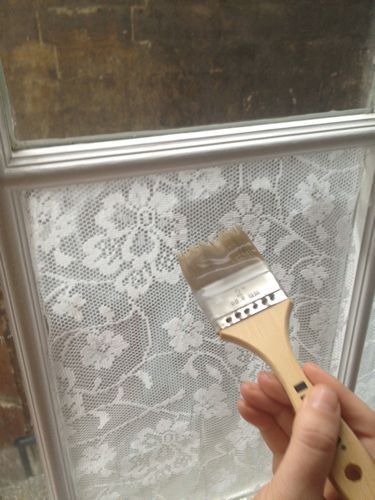
Choose a lace fabric, keeping in mind that the level of privacy will depend on the tightness of the webbing and placement of flowers or design, since the cornstarch paste will dry clear. Measure and cut the lace to fit your window. Paint a thick, even layer of paste onto the window and press the lace into position. Brush another layer of paste onto the applied lace, working from the center to the corners. At this stage, you can adjust the position as needed. The paste may appear cloudy or white for a while, but it should be clear once it is fully dry.

You can vary the level of opaqueness by how many layers of tissue paper you use, but one layer should be enough to achieve a perfect frosted-glass look. Start by brushing on a thin layer of cornstarch paste and placing a piece of tissue paper onto it. Gently smooth out the tissue and any air pockets before carefully brushing a coat of cornstarch paste over the tissue. Continue until with the next sheet of tissue, and so on. Finally, allow to dry. If the solid frosted look isn't for you, try arranging the tissue to create a pattern out of negative space, or use colored tissue for a stained-glass look. If you're looking for a fun quarantine craft for kids, creating artistic stained glass windows with tissue paper is a fun creative way to spend the day.
To remove either of these options when it's time to move out or upgrade to a different window treatment, simply spray down the windows with water and pull off the lace or tissue. There will likely be considerable residue left on the window, but with a scrub cloth or sponge, hot water, and some elbow grease, you'll be able to remove all traces of the cornstarch paste.
Benefits of cornstarch paste and lace or tissue paper:
Challenges of cornstarch paste and lace or tissue paper:
Create the look of frosted windows with specialty spray paint. Several brands make frosted glass spray paint designed to obscure the view for extra privacy while allowing diffused light to filter in, just like actual frosted glass. Use this oil-based spray paint to cover entire panes or use tape or stencils to create a frosted design on your windows. It holds up well in humid or damp conditions, like bathrooms-just avoid the inside of the shower door and any other surfaces directly and frequently in contact with water.
When applying frosted window spray paint, use a steady, sweeping motion and keep the can the same distance from the window to ensure a more even coat. A few lighter coats generally produce better end results than one or two thick coats and allow you more control over the opacity. Just be sure to cover your work area with a drop cloth or old newspapers to catch any overspray and open doors or windows for plenty of ventilation-like any spray paint, the fumes can be dangerous in enclosed areas.
Cleanup from application can be messy, thanks to the particles in the paint that create the frosted appearance, but if you're moving out or redecorating, removing the paint from windows can be done with a little acetone or lacquer thinner, a putty knife or glass scraper, and some patience.
Frosted glass spray is semi-permanent. It will not come off unless you use specialized cleaners and tools to remove it. The best cleaners to remove are acetone and lacquer thinners. For a more natural cleaning substance, vinegar may be used as a substitute (but it may require more scrubbing and wiping).
Benefits of frosted window spray paint:
Challenges of frosted window spray paint:
Glass etching has become a popular craft, making glass etching cream widely available. Etching cream reacts with glass to permanently create a frosted texture. Consumer etching creams are intended for smaller crafting, such as adding a monogram to glassware or a border to a mirror, and discourage use on large, solid areas. If you want a permanent solution and decide to try an etching cream, consider applying a smaller repeating pattern or strategically placed stripes-and be sure to test it out on some scrap glass before committing.
Benefits of glass etching cream:
Challenges of glass etching cream:
Find your local Bloomin' Blinds here or call (855) 457-1022 for more information.

About the Author: Kevin Stuart, Bloomin' Blinds
Kevin has been a part of the Bloomin' Blinds team since 2004. He is an expert in window covering repairs and has been known to finish even the hardest repair in 12 minutes and 26 seconds (the fastest Bloomin' Blinds repair time yet). Kevin loves puzzles and values fixing things and bringing smiles to the faces of his clients.
Warranty Info: All products offered by Bloomin’ Blinds are covered by a limited lifetime warranty for the original purchaser. The warranty protects against the following items: Warping, discoloration, manufacturer material defects and install issues. In the event of a warranty need, there will be no cost to the homeowner and Bloomin’ Blinds will service the repair at your home/office whenever possible. *** Warranty specifics varies by location, please contact for more information.
We are currently looking to expand our business in the territories listed below.
We are always looking to grow! If your preferred location is not listed, feel free to leave a note upon filling out the contact form!
Contact UsWe are currently looking to expand our business in the territories listed below.
We are always looking to grow! If your preferred location is not listed, feel free to leave a note upon filling out the contact form!
Contact UsWe currently have no opportunities available in the entire state of West Virginia.
We are always looking to grow! If your preferred location is not listed, feel free to leave a note upon filling out the contact form!
Contact UsWe are currently looking to expand our business in the territories listed below.
We are always looking to grow! If your preferred location is not listed, feel free to leave a note upon filling out the contact form!
Contact UsWe are currently looking to expand our business in the territories listed below.
We are always looking to grow! If your preferred location is not listed, feel free to leave a note upon filling out the contact form!
Contact UsWe are currently looking to expand our business in the territories listed below.
We are always looking to grow! If your preferred location is not listed, feel free to leave a note upon filling out the contact form!
Contact UsWe are currently looking to expand our business in the territories listed below.
We are always looking to grow! If your preferred location is not listed, feel free to leave a note upon filling out the contact form!
Contact UsWe are currently looking to expand our business in the territories listed below.
We are always looking to grow! If your preferred location is not listed, feel free to leave a note upon filling out the contact form!
Contact UsWe are currently looking to expand our business in the territories listed below.
We are always looking to grow! If your preferred location is not listed, feel free to leave a note upon filling out the contact form!
Contact UsWe currently have no opportunities available in the entire state of South Dakota.
We are always looking to grow! If your preferred location is not listed, feel free to leave a note upon filling out the contact form!
Contact UsWe are currently looking to expand our business in the territories listed below.
We are always looking to grow! If your preferred location is not listed, feel free to leave a note upon filling out the contact form!
Contact UsWe are currently looking to expand our business in the territories listed below.
We are always looking to grow! If your preferred location is not listed, feel free to leave a note upon filling out the contact form!
Contact UsWe are currently looking to expand our business in the territories listed below.
We are always looking to grow! If your preferred location is not listed, feel free to leave a note upon filling out the contact form!
Contact UsWe are currently looking to expand our business in the territories listed below.
We are always looking to grow! If your preferred location is not listed, feel free to leave a note upon filling out the contact form!
Contact UsWe are currently looking to expand our business in the territories listed below.
We are always looking to grow! If your preferred location is not listed, feel free to leave a note upon filling out the contact form!
Contact UsWe are currently looking to expand our business in the territories listed below.
We are always looking to grow! If your preferred location is not listed, feel free to leave a note upon filling out the contact form!
Contact UsWe currently have no opportunities available in the entire state of North Dakota.
We are always looking to grow! If your preferred location is not listed, feel free to leave a note upon filling out the contact form!
Contact UsWe are currently looking to expand our business in the territories listed below.
We are always looking to grow! If your preferred location is not listed, feel free to leave a note upon filling out the contact form!
Contact UsWe are currently looking to expand our business in the territories listed below.
We are always looking to grow! If your preferred location is not listed, feel free to leave a note upon filling out the contact form!
Contact UsWe are currently looking to expand our business in the territories listed below.
We are always looking to grow! If your preferred location is not listed, feel free to leave a note upon filling out the contact form!
Contact UsWe are currently looking to expand our business in the territories listed below.
We are always looking to grow! If your preferred location is not listed, feel free to leave a note upon filling out the contact form!
Contact UsWe currently have no opportunities available in the entire state of New Hampshire.
We are always looking to grow! If your preferred location is not listed, feel free to leave a note upon filling out the contact form!
Contact UsWe are currently looking to expand our business in the territories listed below.
We are always looking to grow! If your preferred location is not listed, feel free to leave a note upon filling out the contact form!
Contact UsWe currently have no opportunities available in the entire state of Nebraska.
We are always looking to grow! If your preferred location is not listed, feel free to leave a note upon filling out the contact form!
Contact UsWe are currently looking to expand our business in the territories listed below.
We are always looking to grow! If your preferred location is not listed, feel free to leave a note upon filling out the contact form!
Contact UsWe are currently looking to expand our business in the territories listed below.
We are always looking to grow! If your preferred location is not listed, feel free to leave a note upon filling out the contact form!
Contact UsWe are currently looking to expand our business in the territories listed below.
We are always looking to grow! If your preferred location is not listed, feel free to leave a note upon filling out the contact form!
Contact UsWe are currently looking to expand our business in the territories listed below.
We are always looking to grow! If your preferred location is not listed, feel free to leave a note upon filling out the contact form!
Contact UsWe are currently looking to expand our business in the territories listed below.
We are always looking to grow! If your preferred location is not listed, feel free to leave a note upon filling out the contact form!
Contact UsWe are currently looking to expand our business in the territories listed below.
We are always looking to grow! If your preferred location is not listed, feel free to leave a note upon filling out the contact form!
Contact UsWe are currently looking to expand our business in the territories listed below.
We are always looking to grow! If your preferred location is not listed, feel free to leave a note upon filling out the contact form!
Contact UsWe are currently looking to expand our business in the territories listed below.
We are always looking to grow! If your preferred location is not listed, feel free to leave a note upon filling out the contact form!
Contact UsWe are currently looking to expand our business in the territories listed below.
We are always looking to grow! If your preferred location is not listed, feel free to leave a note upon filling out the contact form!
Contact UsWe are currently looking to expand our business in the territories listed below.
We are always looking to grow! If your preferred location is not listed, feel free to leave a note upon filling out the contact form!
Contact UsWe are currently looking to expand our business in the territories listed below.
We are always looking to grow! If your preferred location is not listed, feel free to leave a note upon filling out the contact form!
Contact UsWe are currently looking to expand our business in the territories listed below.
We are always looking to grow! If your preferred location is not listed, feel free to leave a note upon filling out the contact form!
Contact UsWe are currently looking to expand our business in the territories listed below.
We are always looking to grow! If your preferred location is not listed, feel free to leave a note upon filling out the contact form!
Contact UsWe are currently looking to expand our business in the territories listed below.
We are always looking to grow! If your preferred location is not listed, feel free to leave a note upon filling out the contact form!
Contact UsWe are currently looking to expand our business in the territories listed below.
We are always looking to grow! If your preferred location is not listed, feel free to leave a note upon filling out the contact form!
Contact UsWe currently have no opportunities available in the entire state of Hawaii.
We are always looking to grow! If your preferred location is not listed, feel free to leave a note upon filling out the contact form!
Contact UsWe are currently looking to expand our business in the territories listed below.
We are always looking to grow! If your preferred location is not listed, feel free to leave a note upon filling out the contact form!
Contact UsWe are currently looking to expand our business in the territories listed below.
We are always looking to grow! If your preferred location is not listed, feel free to leave a note upon filling out the contact form!
Contact UsWe currently have no opportunities available in the entire state of Delaware.
We are always looking to grow! If your preferred location is not listed, feel free to leave a note upon filling out the contact form!
Contact UsWe are currently looking to expand our business in the territories listed below.
We are always looking to grow! If your preferred location is not listed, feel free to leave a note upon filling out the contact form!
Contact UsWe currently have no opportunities available in the entire state of Colorado.
We are always looking to grow! If your preferred location is not listed, feel free to leave a note upon filling out the contact form!
Contact UsWe are currently looking to expand our business in the territories listed below.
We are always looking to grow! If your preferred location is not listed, feel free to leave a note upon filling out the contact form!
Contact UsWe are currently looking to expand our business in the territories listed below.
We are always looking to grow! If your preferred location is not listed, feel free to leave a note upon filling out the contact form!
Contact UsWe are currently looking to expand our business in the territories listed below.
We are always looking to grow! If your preferred location is not listed, feel free to leave a note upon filling out the contact form!
Contact UsWe currently have no opportunities available in the entire state of Alaska.
We are always looking to grow! If your preferred location is not listed, feel free to leave a note upon filling out the contact form!
Contact UsWe are currently looking to expand our business in the territories listed below.
We are always looking to grow! If your preferred location is not listed, feel free to leave a note upon filling out the contact form!
Contact Us